Did you know that whirlygigs, pinwheels, spinny thingys--whatever you call them--are known to date to perhaps as far back as 400 BC? The Chinese believe they are a symbol of turning one's luck around. The Iranians are said to have developed the first vertical windmill in 644 BC to aid with irrigation. By the time the windmill came to Europe in the 1200's the form of the pinwheel is much more recognizable. In Pieter Bruegel's Children's Games of 1560 children are seen with whirlygigs on sticks. Whatever you call them, I don't know anyone that doesn't love the color and spins of a pinwheel!
I've recently starting seeing pinwheels everywhere. Pinwheels galore actually. Since I've always loved them, I made my own garland version above and thought you might want to learn too--so here's my brief pinwheel "how to" lesson--they take some time but I think you'll be pleased--get the kids involved--a perfect summer project! While these don't actually spin, hanging, they look like they could!
Materials Needed For Your Pinwheel Garland
12 inch ruler, pencil, 3- 5 sheets of square paper, spools of ribbon in coordinating colors, large pony beads any color, scissors, hot glue gun, large colorful patterned or plain buttons (1.5 - 2 inch recommended), eyelet set, eyelets
Start with a thick piece of colorful square paper that you have previously painted, decorated, stenciled, etc... (I hand painted handmade paper. Handmade paper is key to the textured look above) BUT scrapbooking paper is so incredible these days you'll have no problem finding preprinted papers to use.
I used 12 inch paper but that makes these very heavy. I guess I would recommend 9 - 10 inch square--if it's double sided you get a great look!
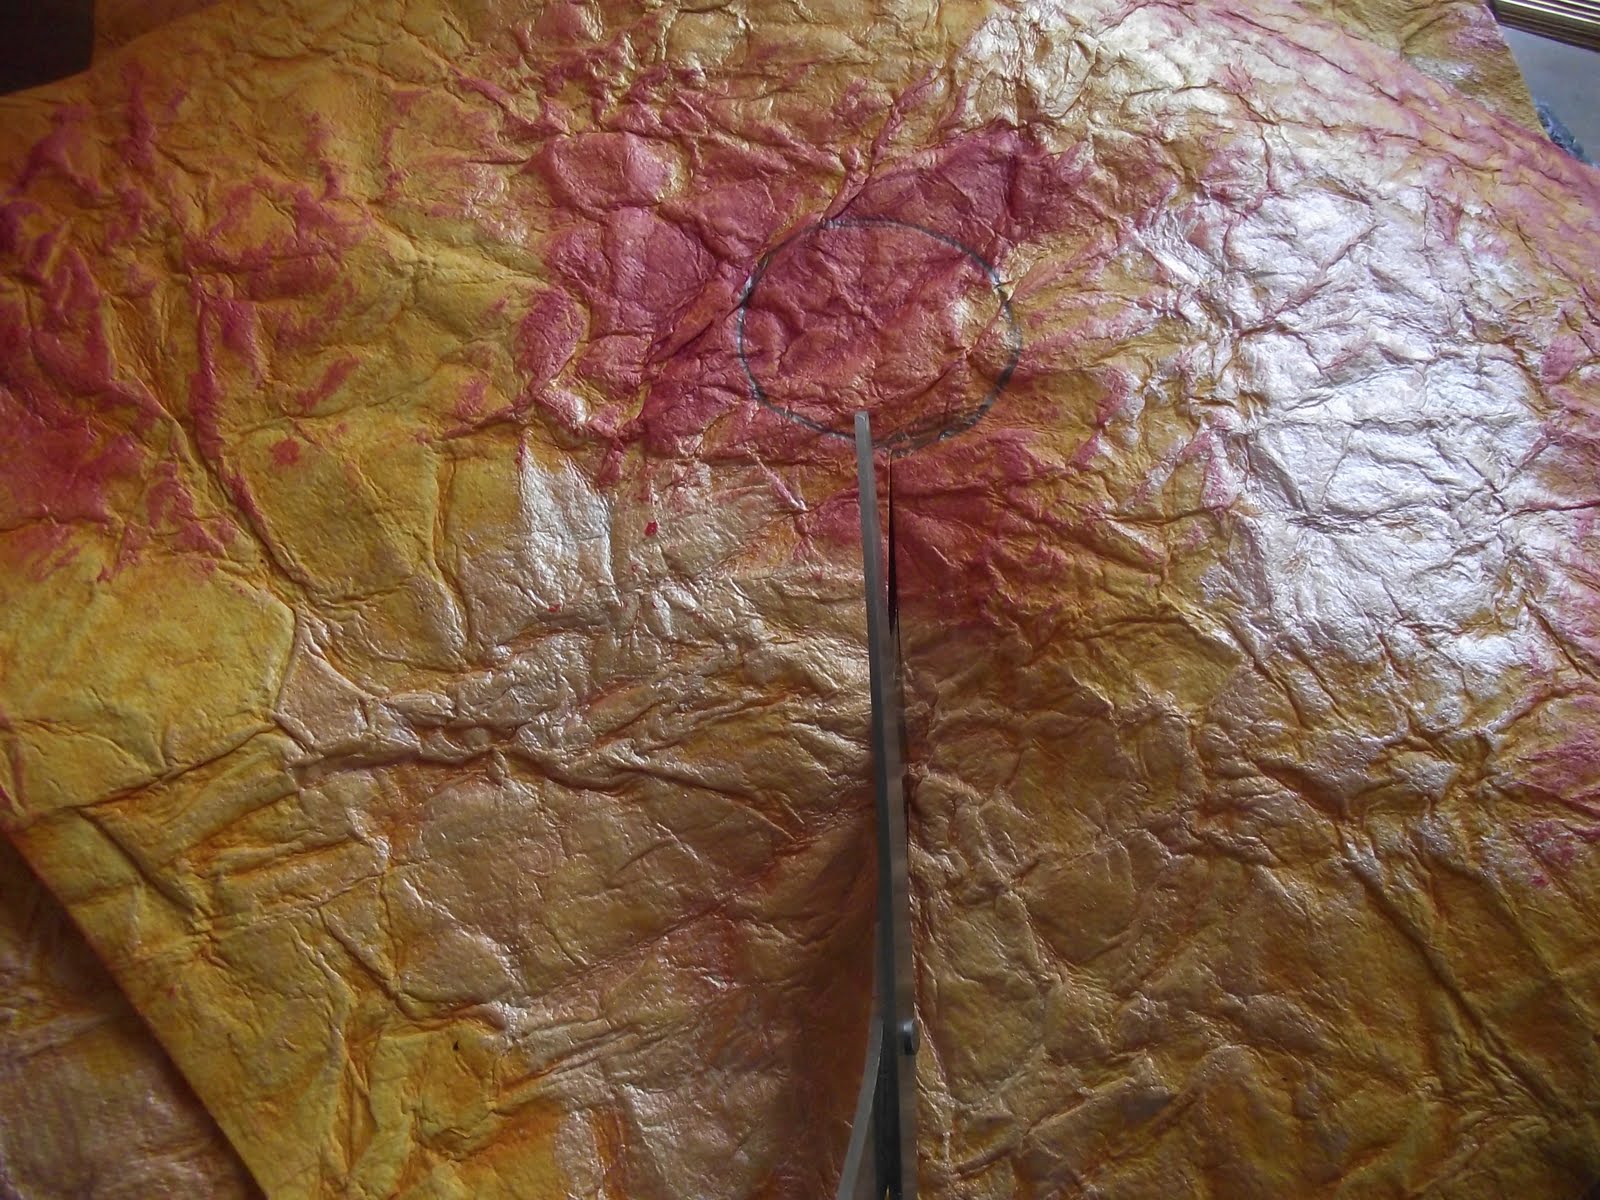
 Using a ruler, find the center point of the paper and mark with an x. You'll need a center circle around that x--I used a clear votive cup, centered it over the x and traced--trace lightly with pencil.
 Now, four cuts need to be made from each corner of the paper to slightly outside of the center circle on the diagonal-- eyeball the cutting if you're good at it or use the ruler to make faint pencil lines.
-
Now you will have four triangle flaps on your paper. In the upper left corner of each triangled section make a small x.
Decide which two opposite flaps will be the sides of your pinwheel and dry fit the flaps in place by lining up the x on your flap to the x in the center. With a flap hand held in place, find a good spot for the eyelet to be placed--look in my photo below and you'll see i placed them just slighly behind the center point of the flap. As long as they are in the same place on both sides, it will hang evenly--but no fear, this isn't rocket science and you have some wiggle room--I eyeballed all of mine and never used a ruler!
-
Now, make a small dot where you want the eyelet to go and put your eyelets in now while the flaps are flat--I did mine afterwards and they worked but this will be easier! Now, you don't really need the eyelets--you could simply poke or punch a hole--totally up to you! And if you wanted to reinforce the holes (the purpose of the eyelets) the low tech way, you could also paint or color those round donut-shaped adhesive reinforcement stickers. After the eyelets or holes are in (you need 2 holes for each pinwheel on opposite sides), dry fit again by connecting the x on the flap to the x in the center and see if they look about right. You can manipulate where you put the corner in the center if you need to correct an error of an inch or less--just put it slightly higher or lower on the center x--remember the large center button will hide a lot!
Bring each x'd left corner to the center x and hot glue down. Let the glue dry between each subsequent corner being glued down--you don't need a lot of hot glue for it to stick, but you do need to hold them in place while it sets. On the last corner, put a bit of hot glue on the button you've chosen and let that help you secure all the pieces together--hold til it has set.
I used pony beads to help secure the ribbons on the insides of my pinwheels--i love using organza ribbon but it would take 20 knots to be thick enough not to go through the eyelet so simply tie the ribbon to the pony bead and feed through the holes--at each end I tied in bunches of coordinating ribbons with a knot.
 The finished garland in the photo is about 80" long but it hangs best when the ends are between 73 - 75 inches.
How long the ribbons will be is up to you--just make them even on the ends and between the pinwheels. The heavier your paper, the shorter your ribbons should be between them or they hang funny.
Didn't take all the photos I wanted to--if you have any questions at all, don't hesitate to say hello--I'll be glad to help!

Have a colorful, spinny, historically creative day!
Susan